Look what I made in less than 1 hour!
I have made several of these now, in all different colors. It is approximately 33" long and has pockets on each side. If you live in a part of the country that gets really cold then this is perfect for that time of the year and it is just the right length so that you can put your hands in the pockets comfortably to keep them warm.
Want to know how you can make one too?
I used fleece fabric for this one, but you can use whatever fabric you want to. I have made some out of wool and a lightweight micro suede fabric and also made some without the pockets using brocade and challis fabrics for a designer look.
This one I made so it is reversible, white on one side and paw prints on the other side. I don't have a pattern so made my own.
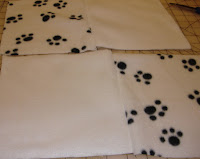
Cut 2 pieces 34" x 7" of each color and 2 pieces, one of each color 9" x 14".
Take one of each of your long pieces and put right sides together. Sew down the long sides.
Take your smaller pieces and put right sides together. Find the middle of the 14" side (7") and draw a line down the center with an erasable pen or chalk.
Go to your machine and with the fabric pieces still together, put your sewing foot along the edge of the line and sew down the side (do not sew on the line), then turn around and do the same on the other side. You should now have a seam on each side of the line you drew.
Now cut down the line, you should have 2 pieces with 2 different colors on each piece when opened up.
Turn over the top of each piece to make a 1/2 inch hem. If you have fabrics that will ravel then turn over 2 times but only 1/4 inch each time.
Now take each of your smaller pieces and put them on each end of the longer pieces, right sides up. (If you want to mix it up a little, you can switch the colors around. I chose to have the paw prints on the same side and the white on the same sides). Sew across the bottom (ends) of each one.
Lay the pockets flat and sew up the middle (from bottom to top of pockets) in the seam.
Put the other side of the long pieces together (the opposite sides of where the pockets are) and sew across the ends.
Now you should have one long piece. Fold in half length wise making sure the sides of the pockets line up.
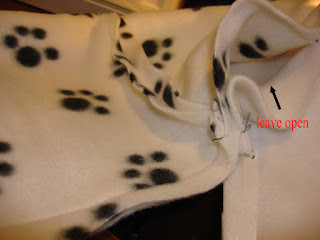
(You should probably pin together so they stay in place). Now sew around the outside edges. Stop near the middle and leave a gap, about the size that you hand will fit through.
Finish sewing the rest of the outer edge.
Put your hand in where you left the gap and turn right side out, making sure a pocket is on each side. I use a knitting needle and push the corners out at the ends.
You can either hand sew the gap closed or as I did on this one, topstitch all the way around.
If you would like, you can take extra fabric and make 2 small rice bags which can be heated in the microwave. Then put them in the pockets and this will keep your hands extra warm. Do this at your own risk though! I have never had any problems and have made many.
If you make one, I would love to see it!
If you have any questions, please leave me a comment or feel free to email me.
Thanks for visiting! Have a great day!
Mrs. T


4 comments:
Hello Michelle! I like your new piece of clothing! You are amazingly skilled and gifted to manage to sew this in such short time! Congratulations! Your blog is lovely. Your yard & garden seem to respond to your hard work and green fingers amazingly!
This looks like such a great project. I live in Miami, but I get cold easily. Is there any kind of special fabric to use on the rice bags? XX Hollychihuahua from Swap-Bot
@Lola
I usually use a cotton fabric for the rice bags for the scarves. I have made bigger ones though that I have used fleece fabric. I have also made the scarves with a pocket in the center and made a race bag to put in it and use velcro to close it. Helps keep my neck really warm in the winter.
fun! thanks for linking up to mom it monday!
Post a Comment