Showing posts with label Sewing. Show all posts

Wednesday, January 2, 2013

A New Year and Some of my Craft & Sewing Projects

It has been quite a while since I have posted.  It is a New Year and I am going to try my best to post to my blog as often as I can.

I also want to thank everyone who stayed with me, subscribed to my blog, came to visit my site and posted comments on my blog!

I want to show you some  items I made several years ago. I put them on Listia and auctioned them off.  I have put a lot of items on there and auctioned them off. It doesn’t cost money. You earn credits and bid on items with your credits.  Some things I made and some things are just items I no longer needed or wanted. I was able to get a lot of gifts for my family for Christmas and Birthdays by using Listia.

DSC05246DSC05247DSC05248

This Valentines box started out with a wood box I purchased from Michaels.I started out by taking the latches off and painting the inside. I  then covered it with scrapbook paper, added 3D stickers and ribbons. I cut  out some cardstock to look like small file folder inserts and covered them with paper, stickers and ribbons. I left room for a picture or a place for someone to write something.

DSC05244DSC05245DSC05322

This little beauty also started out with a wood box. I removed the latches and painted the inside. I drilled two holes in each side of the box  near the top of the bottom part of the box.  I also drilled holes in the front, top and bottom portions to attach a bead and elastic to hold the box closed..  I then got out my polymer clay and mixed some black and white together, rolled it out smooth and glued it onto the box. I made a little pocket for the front and glued it on as well.  I baked it in my oven till it was hard, let it cool and  then  I sprayed it with a couple coats of clear spray. I glued ribbon around the top and bottom, made a bead out of polymer clay for the front of it and attached black elastic to hook the button.  I added ribbons on each side for the handles which I attached with some brads that looked like screw heads.   I never got around to using it so after sitting in my cupboard for a couple of years,  I decided it needed to go to someone who would use it. I posted it on Listia  and auctioned it off.

DSC05286DSC05287DSC05288DSC05289

This purse is another I never got around to using so it was auctioned as well. I had some jeans that weren’t suitable for wearing any longer, so I cut them off to the length shown. I made some triangles out of a bandana and sewed onto the bottom, made handles out of a bandana and a tie that I put through the loops on the top of the jeans. I also made a lining for the purse. I got out some  red beads from my stash and sewed them around the outside of the pockets. I also put a wood horseshoe and a wood horse on the back pockets.

DSC05342DSC05346

These 2 purses/bags were just an idea in the  making. I started out by doing some scrappy quilting, then decided to make them into purses/bags. I lined both of them and they went to auction as well.

Most of the items I make start out as an idea and usually end up as something entirely different than I envisioned.  I seldom use patterns and even if I do, the items still  usually don’t end up like the pattern.  I normally just start something and work on it until I get something I like. If I don’t like it, then it gets recycled.

I take one day at a time and do what I can and hopefully accomplish something. Smile I am going to try really hard to work on my blog and  maybe you will come back to visit me. Would love to hear from you!

I hope everyone has a wonderful New Year with lots of good things happening in your lives!!  Smile

Have a great day!!

Mrs. T


Monday, October 31, 2011

Paw Prints To Scarf!

Look what I made in less than 1 hour! 

I have made several of these now, in all different colors. It is approximately 33" long and has pockets on each side. If you live in a part of the country that gets really cold then this is perfect for that time of the year and it is just the right length so that you can put your hands in the pockets comfortably to keep them warm.
Want to know how you can make one too?
I used fleece fabric for this one, but you can use whatever fabric you want to. I have made some out of wool and a lightweight micro suede fabric and also made some without the pockets using brocade and challis fabrics for a designer look. 
This one I made so it is reversible, white on one side and paw prints on the other side. I don't have a pattern so made my own.
Cut 2 pieces 34" x 7" of each color and 2 pieces, one of each color 9" x 14". 


Take one of each of your long pieces and put right sides together. Sew down the long sides. 

Take your smaller pieces and put right sides together. Find the middle of the 14" side (7") and draw a line down the center with an erasable pen or chalk.
Go to your machine and with the fabric pieces still together, put your sewing foot along the edge of the line and sew down the side (do not sew on the line), then turn around and do the same on the other side. You should now have a seam on each side of the line you drew. 


Now cut down the line, you should have 2 pieces with 2 different colors on each piece when opened up.
Turn over the top of each piece to make a 1/2 inch hem. If you have fabrics that will ravel then turn over 2 times but only 1/4 inch each time. 

Now take each of your smaller pieces and put them on each end of the longer pieces, right sides up. (If you want to mix it up a little, you can switch the colors around. I chose to have the paw prints on the same side and the white on the same sides). Sew across the bottom (ends) of each one.

Lay the pockets flat and sew up the middle (from bottom to top of pockets) in the seam.


Put the other side of the long pieces together (the opposite sides of where the pockets are) and sew across the ends.

Now you should have one long piece. Fold in half length wise making sure the sides of the pockets line up.

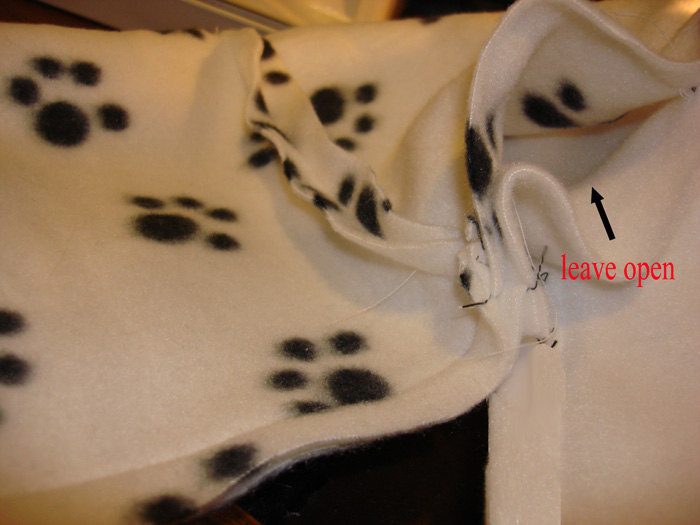
(You should probably pin together so they stay in place). Now sew around the outside edges. Stop near the middle and leave a gap, about the size that you hand will fit through. 

Finish sewing the rest of the outer edge. 

Put your hand in where you left the gap and turn right side out, making sure a pocket is on each side. I use a knitting needle and push the corners out at the ends. 


You can either hand sew the gap closed or as I did on this one, topstitch all the way around.


If you would like, you can take extra fabric and make 2 small rice bags which can be heated in the microwave. Then put them in the pockets and this will keep your hands extra warm. Do this at your own risk though! I have never had any problems and have made many.
If you make one, I would love to see it!
If you have any questions, please leave me a comment or feel free to email me.

Thanks for visiting! Have a great day! 
Mrs. T

Tuesday, April 26, 2011

A Pillow for Alicia

My daughter Alicia's birthday was March 2nd, so I was a little late on getting her gift to her. She had mentioned that she needed pillows, so her being the cat person she is, (she like has 100 cats, well, maybe not 100 but probably 6 or 7 or ?), I thought I would make her a pillow with cats, to add to her collection of live cats.
I started making one with a stencil and it didn't turn out to my liking so I tossed it. I didn't take a picture of it either...oh well.
I got out my handy dandy cricut machine (which I love!!), used some cotton fabric that I cut to 12" x 12", ironed on some interfacing to the back of it, opened up a picture of these cats on my computer and put a marker in the cricut and this is what it drew (kind of funky, whimsical cats, don't ya think?) :

I added some black cotton fabric for a border, added another piece of black fabric for the back and put a pillow inside and this is what it looks like:
Happy Late Birthday Alicia!!!
Related Posts Plugin for WordPress, Blogger...